Jan 28, 2007

Reading Classification Card Duvets

I recently added Amy Butler's sewing pattern book "In Stitches" to my craft book collection. What I found inside was well worth the $17 I spent for it at amazon. Pictured below is the photo of the "photo duvet" aka "reading classification card duvets!" The photo duvet pattern is also sold separately here. Here is my version of the set:


These are really great for their purpose - protecting and attractively storing reading classification card sets. Each pouch features a cardboard/matboard square that is hidden within two layers of fabric which are then sewn closed. This serves two purposes - it allows the children to more easily insert the cards after they have finished, and it protects them from the bumps and nicks of daily classroom usage.

One duvet is made following the pattern exactly. The second I modified to hold the labels.

This set was made using 3 Fandex Tree sets, available at Michael Olaf. (Two for the set, and one for my reference.) These are beautiful die-cut photos of 47 tree leaves in North America. The set also shows the bark and the seeds and/or flowers of the tree. Here is one example of the card sets:
I used the font "Chopin," which I downloaded for free from this German site. Click on "search" and type in Chopin. Download the file, extract it from (I believe) zip form, and save it in your Window's font folder. I like this font because it remains pretty true to the sandpaper letters, with a few easily decipherable exceptions.

The cards were then laminated with the best gift I've ever received from my thoughtful husband, the Xyron 900. This machine is a wonder, as it allows you to laminate without having to leave an ugly edge of laminate around the card. The results look super professional. The Xyron has many other functions as well, but I have yet to try them. It's available for about $80 from amazon. You will have buy a two-sided lamination cartridge as well.

As for the nifty leaf fabric, it is one of many I have found at online at Craft Connection. You can search fabric by theme. For any given set of two reading classification card duvets, you will need either a "fat quarter" or half a yard, plus a half yard of coordinating fabric for the "inside" of the duvet.

Materials:
fat quarter or 1/2 yard of theme fabric
1/2 yard coordinating fabric
set of 4 grommets with tool (available at Joann's Fabrics)
1/4 yard of heavyweight fusible interfacing (Joann's)
coordinating thread
scissors
sewing machine
hand sewing needle
iron/ironing board
Amy's pattern
straight pins
matboard or cardboard

Here's my modification for the reading classification control cards and labels duvet:

Cut the coordinating fabric to 5 1/2" x 2 3/4."
Fold all edges in 1/4 inch and iron. Then fold three of the edges over again, another 1/4 of an inch, and fold the right short edge over about 3/4 of an inch. Iron.
Pin to the front panel and topstitch close to the edge around all but the right edge (with the bigger fold.) Continue with the pattern as written.

*Note*
If you are making folders for Audubon field guide cards, make sure you measure the finished control card and label. My guess is that you will have to make the modified duvet about 1 inch longer than Amy's pattern dictates. To do this, simply extend the length of the front and back pattern pieces by an inch when you are cutting them out. Then follow the instructions as before.

To make the label pouch on the front of the duvet for Audubon cards, extend the dimensions of the coordinating fabric to 7" by 2 3/4 " instead of 5 1/2" by 2 1/2."

Jan 24, 2007

Underlays are underrated


Underlays have many, many uses. And after you make some of these, you're sure to find more excuses to use them in the classroom. Here are a few ideas ...

*writing on a table, of course
*math work
*one for you so you can record your observations on your lap
*a stash for children to take outside while they write poems, work, etc.
*metal insets
*artwork

I am so enamored with these that I think I might make smaller variations into coasters for a friend's birthday.

Materials:


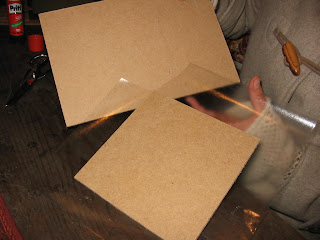
book board of various sizes - 14cm x 14cm is the standard for the metal insets. (I think it's called book board in English. I could be wrong. My bet is that you can find it at Michael's. What I used is a pressed cardboard, several millimeters thick and unbendable. Perhaps mat board would work as well. The important factor is that the surface is smooth. I'm lucky ... the husband of the head of my school is a carpenter and quickly cut these to size for me.)

contact paper
exacto knife
scissors
glue stick
photos from magazines

Using an exacto knife, cut a photo from a magazine. I used National Geographics. Make sure no particles remain on the board by wiping it off with a clean rag. Then apply glue to one side of the board.

Place the photo on the glued side. Carefully smooth, beginning from the center and working your way to the outer edges.
Cut a piece of contact paper, leaving about 1.5" of border around the board. Apply contact, smoothing from the center out.
Cut each of the four corners at an angle.
Press the remaining contact onto the back of the board.Place a small piece of contact paper on the part of board that remains exposed. You're done!

Jan 21, 2007

Thermic Bottle Cozy

Posted by Meg
This little knitted cozy helps to extend the shelf life of the thermic bottles ... and helps you use your extra bits of yarn!
Materials:
Left over yarn, preferably natural fiber
4 double-pointed knitting needles, small
(I used US size 3)
Blunt-tipped needle for weaving in edges

Cast on 30 stitches using a long-tail cast-on. Divide evenly among 3 needles. Join for knitting in the round, being careful not to twist the stitches. Knit in stockinette stitch until the cozy measures about 3 inches or desired length to fit the bottle. Bind off and weave in tails. I flipped mine "inside-out" so that more of the multi-colored poofs were visible. For instructions on how to knit using double-pointed needles, I recommend this tutorial by knitty.com.

Show the children how to remove the cozy from the bottle like so, touching the cap only and not the metal sides:Provide a basket where the cozies can be placed while the child is working with the material.

Jan 18, 2007

Story Problems and Pouch

Submitted by Karla Norgaard
email: knorgy*at*earthlink*dot*net

Materials:
Felt piece 10.5" x 11" (green)
Felt piece 10.5" x 2.75" (blue)
Small piece of sew-on velcro
Embroidery thread

1. Embroider letters onto small piece of felt. Hint: start with a piece of felt larger than 10.5" and cut to size after embroidery is finished. Then you can center the words.
2. Fold up one edge of the large piece of felt 3.75" to make a pocket. Pin in place.
3. Pin the smaller piece of felt to the top flap of the larger piece. Cut both layers to make rounded corners.
4. Blanket stitch around the whole pouch.
5. Blanket stitch the top edge of small felt piece.
6. Sew velcro in place.

For a Word file of Story Problems, sign up for the Montessori by Hand Yahoo group by clicking on the purple box in the sidebar. Over 40 word problems await you!


Jan 16, 2007

Walking the labyrinth

I've had enormous success with this labyrinth in the outdoor environment. Not only does it provide the challenge to balance and movement that young children desire, it is a wonderfully quiet and meditative activity.

In this photo, you can see one of the four year-old girls winding her way out of the stone pathway. I've found it to be suitable work for all but the very, very young. It can even have a calming affect on the most excitable children of the group.

Living in rural Mexico, finding the materials to build it was fairly easy and didn't cost one cent. We took a pick-up down to a river, gathered a good pile of small to medium-sized smooth rocks (this is important for safety reasons,) and put another pile of fine sand on a tarp. Those who don't have access to a river or a truck might consider making friends with someone who has a truck, and call around to see where they might sell the rocks you need. Once back at the site, sketch out the design on the ground with a stick. Here's an example labyrinth design.

I found it easiest to begin drawing from the cross in the middle, and to work my way outward from there. Also figure that you will be leaving about 8 to 10 inches for the sand pathway, and that the rocks themselves take up a substantial amount of space ... more than your stick drawn lines! Once satisfied with the layout, begin placing the rocks. Finally, spread the sand about 1/2 inch thick along the pathway.

This work is done barefoot. I provide a small chair at the entrance to the labyrinth where the child can remove his shoes and socks. Next to the chair is a brush he can use to clean the soles of his feet once he exits, before putting on his shoes once again.

The presentation's points of interest are: walking slowly, keeping your eyes on the path ahead of you, and turning around at the center of the labyrinth.

Jan 15, 2007

Music Mat


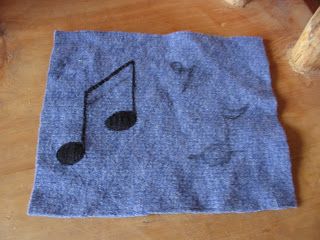
In my classroom, we use this comfy, felted mat to define the child's space while she is listening to music. I made my version out of thrift store finds. Purchase a few, old 100% wool sweaters and felt them. My experience has been hit or miss with these sweaters, even if the material states that it's 100% wool. Just to be safe, buy several and hope that at least one gives you the thick, matted results you are looking for.

Cut them into pieces and place each sweater in a separate pillowcase, tying the top closed. Put the pillowcases in the washing machine with a bit of detergent for a full hot/cold/rinse cycle. Check the results. Perhaps you would like to repeat the wash cycle, or you might try to throw them in the dryer for a bit of extra shrinkage. The fiber should be noticeably thicker and significant shrinkage should have occurred.

Once the felt is dry, cut 2 pieces to 12"x16". Then, use a pencil or fine-tipped marker to draw the design on one of the fabric pieces. I did mine freehand using some piano music as a guide. Once your design is outlined, you can begin with the embroidery. I used a generic embroidery floss with all 6 threads. You could also use yarn. Check out this website for how-to videos. I also HIGHLY recommend the book Colorful Stitchery by Kristin Nicholas. A few short months ago I had never considered doing embroidery, and her book has changed it all. She has some great project ideas and clear instructions for each kind of stitch. For my music mat, I used chain stitch, satin stitch, crewel outline, and blanket stitch.

Finally, you can use blanket stitch to join together the four sides of the two pieces of felt, using large safety pins to secure the fabric while you are stitching. Because of the thickness of the felt, no stuffing is needed. (Note the thickness in the photo ... and the cat, which means that the music mat has passed the comfy test!) All that's left to do is give grace and courtesy lesson on where to sit when listening to music!

Jan 14, 2007

Creating a creative community

I have always been fascinated with making materials for my classroom. I have an on-going love affair with beautiful fabrics and nature photos. The sewing machine and I enjoy a symbiotic relationship. At night, visions of felted, child-size meditation mats and handmade books dance in my head. Am I alone in such a glorious obsession?

My guess is no. In fact, after many a conversation with my colleagues, I realize that crafty Montessorians are numerous; we just lack a creative community - a place to share ideas, resources, and methods. And now, with the accessibility of the Internet and blog sites, the door of opportunity swings wide open before us! My intention with Montessori by Hand is to provide the cyberspace for us to bounce ideas off one another and support each other in our work as Montessori guides. How helpful would it be to have at our fingertips a large database of picture tutorials on how to make certain materials? What about eventual material swaps, where participants would make a classroom material and send it to a partner, and their partners would send them something original in return? The possibilities are numerous.

The hope is that the word will get out about this creative community and that many of you will be motivated to submit photos and instructions for your materials, as well as other ideas and resources. Montessori by Hand won't be limited to aprons and classified cards. Submissions can and should include the following (and more): recipes for practical life, meditation/yoga, gardening, science experiments, art materials, recommendations for good books, sensorial material extensions such as geography and history, art appreciation, etc. The idea is to create abundant resources for A to I, Children's House and Elementary Montessori teachers. Whatever the mind conceives, the eye sees, or the hand makes belongs here on Montessori by Hand!

So get out your cameras and start submitting ideas! All submissions should be sent to montessorirevolution*at*gmail*dot*com.